Welcome to the introductory course on Linux and R! By the end of the course, you will understand basic Linux and R commands to perform file management, user permissions and process handling. If you have any questions please don’t hesitate to ask one of the instructors or fill in the contact form at the beginning of this page. This first (practical)course consists of two modules:
1. Linux
1.1. Introduction to Linux
1.2. Basic Linux Commands
1.3. Basic Shell Scripting
1.4. Useful links and tutorials
1.5. Practice Exercises
2.R
2.1. Introduction to R
2.2 Introduction to Rstudio
2.3. Basic R scripting
2.4. Useful links and tutorials
2.5. Practice Exercises
Author of this course: Pascal Nuijten
Linux
1.1. Introduction to Linux
Linux is an open-source operating system based on Unix. It is widely used in servers, embedded systems, and personal computers due to its security, stability, and flexibility. Here we list some key differences between using Linux, Windows or MacOS as an operating system:
| Feature | Linux | Windows | macOS |
|---|---|---|---|
| Cost | Free and open-source | Paid (license required) | Paid (included with Mac) |
| Security | Highly secure, fewer viruses | More vulnerable to malware | Secure, fewer viruses |
| Customization | Highly customizable | Limited customization | Limited customization |
| Performance | Efficient, lightweight | Can be resource-heavy | Optimized for Apple devices |
| Software Availability | Large open-source repository, but some proprietary software may not be available | Wide software support | Good software support but limited outside Apple’s ecosystem |
| Hardware Compatibility | Runs on most hardware | Designed for a variety of PCs | Only runs on Apple hardware |
| User Experience | Can be complex for beginners | User-friendly interface | Intuitive and smooth UI |
| Support & Community | Large online community support | Official Microsoft support | Official Apple support |
| Updates | Regular updates, user-controlled | Forced updates in some cases | Regular and stable updates |
| Use Case | Servers, development, power users | General use, gaming, business | Creative professionals, Apple users |
A Linux distribution (distro) is a packaged version of Linux that includes the kernel, software, and package management systems. Some popular distributions include:
- Ubuntu (Beginner-friendly, widely used for desktops and servers)
- Debian (Stable and reliable, often used for servers)
- Fedora (Cutting-edge software, used for development)
- Arch Linux (Highly customizable, recommended for advanced users)
You can set up a Linux environment in multiple ways:
- Install Linux on Your PC – Dual boot with Windows or replace your current OS.
- Use a Virtual Machine (VM) – Install Linux inside VirtualBox or VMware.
- Use a Live USB – Run Linux without installation using a USB drive.
- Use Windows Subsystem for Linux (WSL) – Install Ubuntu or other distributions inside Windows.
For the sake of this course we are going to install the last option : Ubuntu as a windows subsystem. If you already have Linux (in any of the above mentioned ways) installed, you can skip to the next chapter of this course.
Installing Ubuntu on your computer
We will cover the installation of Ubuntu for Windows. If you are using MacOS you can run Linux commands used for this course directly in the command line.
Windows
- Open the terminal of your computer by typing “cmd” in your windows search bar
- Copy paste the following code in your search bar:
wsl --install -d Ubuntu
- After the installation finished, reboot your computer (restart)
- Now open the Ubuntu terminal by searching it in your Windows search bar
- The Ubuntu terminal will ask you to make a new user and password, Please remember or write down the password!
- Congratulations! You now have a fully functional Linux environment on your windows computer
1.2. Basic Linux commands
In this module we will go over the most important operations that you can perform in Linux. We will start with navigating through the directories on your computer. To see in which directory you currently are you can use :
pwd
Now if you want to see the content of the directory that you are in you can use :
				ls
ls -l #Detailed description
ls -a #Include hidden files
ls /path/to/folder #Content of a specific folder
Now if you want to change to a folder you can use the following command :
(Tip : if you don’t remember the exact name of a file/folder you can use “tab” to make the terminal finish your command)
				cd /home/user/Documents #Navigate to your Document folder (could be different on your machine!)
cd .. #Go up one level
cd ~ #Go to the home directory
cd #Go to start directory
Please take a little time to navigate through your folders and get familiar with the commands.
Now we will talk about File and directory management. The terminal can be used not only to navigate through files and folders, but also to create them. If you would like to make a new file or folder you can use the following command(s) (note that you can change the file extension from .txt to for example an R file: .r)
				touch myfile.txt #Create a file in current directory
mkdir myfolder #Create a folder in current directory
For editing a file that you have created you can either use your favorite text/code editor or you can use/install one of the file editor of Linux such as : Neovim, Ne, Vim, Gnu Emacs, MCEDIT, Nano or Micro. For the rest of this course we will mainly work with Nano. To browse and create files/folders you can use copy (cp), move/rename (mv) or remove (rm) files/folders :
(Tip : If you use * you can select all content of a folder to easy perform an operation on all files!)
				cp myfile.txt myfolder/ #copies myfile.txt in to the folder myfolder
mv myfile.txt myfolder/newname.txt #moves myfile.txt to myfolder and renames it to newname.txt
rm myfolder/myfile.txt #removes myfile.txt from the folder myfolder
Linux also offers you tools to learn more about the files in your folder. Here are some simple operations you can perform on files in your folder : (note that for the example files created in this course the information is limited)
				cat myfolder/myfile.txt #Displays the content of a file
less myfolder/myfile.txt #Allows you to scroll through myfile.txt
head myfolder/myfile.txt #Shows the first few lines of myfile.txt
tail myfolder/myfile.txt #Shows the last few lines of myfile.txt
The command line can also be used to download files from the internet. If you have an active internet connection (WiFi or WLAN) you can use wget to download files :
wget https://carrionlab.com/wp-content/uploads/2021/05/BE-Basic_picture-350x525.jpg
There is many more options for wget that we will not cover in this course but you can read more about here.
1.3. Basic Shell Scripting
Shell scripting is a way to automate tasks in Linux by writing a sequence of commands in a file that the shell can execute. It is useful for automating system administration, repetitive tasks, and batch processing. In this tutorial we will make you familiar with some basic Shell scripting. Start by opening your Ubuntu terminal and creating your first script file :
nano myscript.sh
In Shell (BASH) scripting we always indicate the type of file in the first line. For BASH we add #!/bin/bash in the first line of the file. For our first script we will print a simple sentence by adding echo “Hello, Ubuntu!” on the second line. In this case your file should look something like this :
				#!/bin/bash
echo "Hello, Linux!"
To now save this file press CTRL+X, nano will now ask you if you want to save the file. You can confirm this by pressing Y and choose the name followed by Enter. Now for shell scripts we have to give the script execution permission. This is done by the following command in the (Ubuntu) terminal :
chmod +x myscript.sh
The last step is to simply execute the script and it should print “Hello, Linux!” in your terminal
./myscript.sh
Now we will make things a little bit more advanced by using variables. We can save variables and use them later again, or multiple times. Go to the script (myscript.sh) again by using nano and change the code for the following :
				name="Victor Carrion Bravo"
echo "Hello, $name!"
Safe the script, make it executable and run it again (see previous steps). It now should execute the name inserted in the variable $name. You can also use input of a user as a variable, this could be of use if you want to make a more dynamic script :
				echo "Enter your name:"
read user_name
echo "Hello, $user_name!"
Just as most coding languages bash shell scripting also incorporates if statements and for/while loops. For these loops its important to always use a “tab” when you enter in to the loop. In the next two examples we will show you a basic use of if/else and for/while. In the first example we will tell the user whether he/she is an adult or a minor, depending on the age (Do not forget to safe the file and make it executable!) :
				echo "Enter your age"
read age
if [ $age -ge 18 ]; then
    echo "You are an adult."
else
    echo "You are a minor."
fi
In the next example we will iterate over a list of numbers from 1 to 5 and print every number in the terminal using echo :
				for i in 1 2 3 4 5; do
    echo "Number: $i"
done
In this last, a bit more complicated, example we accomplish the same as in the previous example: iterating over a list of 5 numbers and printing every number in the terminal with echo. The while loop keeps being executed until the $count variable reaches 5. After the number is printed in the terminal, the number is increased with +1 (indicated as ++).
				count=1
while [ $count -le 5 ]; do
    echo "Count: $count"
    ((count++))
done
We now covered the basics of Linux and bash scripting. If you feel like you need more explanation/information make sure to check out the next section with useful links and tutorials. Else you can try to complete the practice exercise below!
1.4. Useful links and tutorials
1.5. Practice Exercises
The following exercises are meant to test yourself for your knowledge obtained in these lessons about Linux and Bash scripting. If you get stuck you can always use the internet to find answers, if that does not help feel free to asks any questions to the tutors or in the dialogue at the beginning of this page. Ask the tutors for the password to see the answers of the questions!
Exercise 1 (Easy)
Answer to question 1:
Exercise 2 (Intermediate)
Write a script that asks the user for a number and then prints whether the number is even or odd.
Exercise 3 (Hard)
Create a new Bash script that creates 5 files named file1.txt to file5.txt then creates a folder called moved_files. And next with the use of a for loop move all files to this folder. Then create a while loop to list all folders in the moved_files folder
R
2.1. Introduction to R
R is a programming language and environment specifically designed for statistical computing and data visualization. This tutorial introduces the basics of R scripting for beginners, covering essential concepts and hands-on exercises so that you can use R on your own (future) datasets.
To ensure a smooth experience throughout the course, address installation issues early on. You can always ask or email instructors if you are having issues.
Otherwise, see the general tips below, or try asking a question on Stackoverflow.
Some general tips that will save you a lot of headaches with software during your education:
- Setting your system language to English (Windows, Mac) makes everything a lot easier to find;
- If you store data in Excel, setting the decimal separator to a dot (.) instead of a comma (,) will also save you a lot of extra effort;
- If you are on Windows, we highly recommend working on an account with administrator rights and setting user account control to “Never notify”. (Link says Windows 7 & 8, but it works the same for Windows 10.)
Tip: There is an installation tutorial video in the useful links and videos module
2.2. Introduction to Rstudio
Rstudio is a user-friendly interface built for people using R. After installation (previous module) and opening R you will have the following interface :
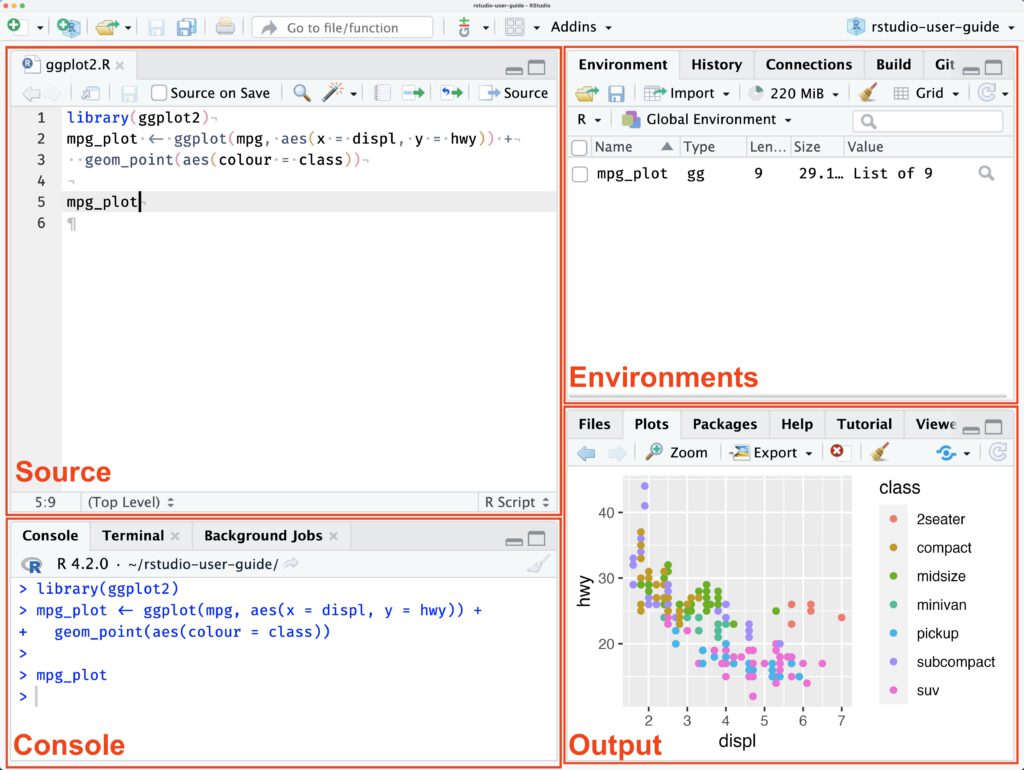
Rstudio is divided in 4 main panes :
- Source Pane (Top-Left)
- This is where you write and edit R scripts.
- You can open multiple script files in tabs.
- Execute code by selecting it and pressing
Ctrl + Enter(Windows/Linux) orCmd + Enter(Mac).
- Console Pane (Bottom-Left)
- This is where R executes commands.
- You can type commands directly here for quick testing.
- Displays errors and output from scripts.
- Environment/History Pane (Top-Right)
- Environment Tab: Shows all the variables, functions, and datasets currently in memory.
- History Tab: Keeps a record of previously executed commands.
- Output (Bottom-Right)
- Files Tab: Navigate your working directory and manage files.
- Plots Tab: Displays graphical output of data visualizations.
- Packages Tab: Manage installed R packages.
- Help Tab: View R documentation and function descriptions.
Additionally to these 4 panes you can use the top toolbar that can be used to: run scripts, save files and manage projects.
2.3. Basic R scripting
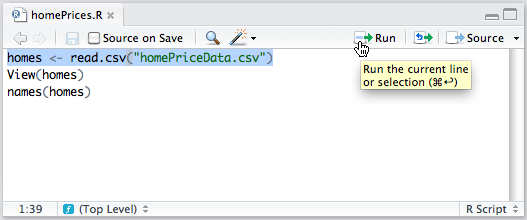
In this module we will show some basic operations that you can perform in R. Just as Bash shell scripting, R is a programming language with its own rules. Make sure open Rstudio and create a new file in the source pane to follow along with this practical. In R variable assignment is done using <- (e.g. x<-5). After creating your script it can be executed using Ctrl + Alt + R or this symbol in the toolbar of your source pane :
We will start with some basic data types that exist in R:
				# Numeric
x <- 10.5

# Integer
y <- as.integer(5)

# Character (String)
z <- "Hello, R!"

# Logical (Boolean)
b <- TRUE
After assignment of variables you can find them back in your environments pane in Rstudio (right top). You can also print these values in your console :
				# Assigning values
name <- "Alice"
age <- 25

# Printing values
print(name)
age
We can also perform some basic operations on numbers and safe them directly in variables :
				# Arithmetic Operators
sum <- 5 + 3
product <- 5 * 3

# Comparison Operators
is_greater <- 5 > 3  # Returns TRUE

# Logical Operators
and_operation <- TRUE & FALSE  # Returns FALSE
R has just as Bash Shell scripting if-else loops, but remember to use the right indent with the use of “tab”
				x <- 10
if (x > 5) {
  print("x is greater than 5")
} else {
  print("x is not greater than 5")
}
Same goes also for While and For loops :
				count <- 1
while (count <= 5) {
  print(count)
  count <- count + 1
}
				for (i in 1:5) {
  print(i)
}
One of the advantages of working with R is that it is adapted for working with bigdata sets. Data manipulations and processing is rather easy and efficient. R knows special variables that are called vectors. A vector is a basic data structure in R that contains elements of the same type (numeric, character, or logical). Vectors are useful because they allow you to store and manipulate multiple values efficiently.
				numbers <- c(1, 2, 3, 4, 5)
print(numbers)
names <- c("Alice", "Bob", "Charlie")
print(names)
Then these vectors can be saved in a so called dataframe. A data frame is a table-like structure where each column is a vector, and each row represents an observation. Data frames are useful because they allow you to store and analyze structured data similar to spreadsheets.
				# Creating a data frame
data <- data.frame(
  Name = c("Alice", "Bob", "Charlie"),
  Age = c(25, 30, 35)
)
print(data)
R has several possibilities to import and export data from different formats. Here you find an example on how to download a file called data.csv (which can be found here) which we will use later in this module. You will see that R exports the same data again with the name output.csv using the write.csv function:
				# Reading a CSV file
data <- read.csv("data.csv")

# Writing to a CSV file
write.csv(data, "output.csv")
As soon as the scripts become more complex you can use functions to keep things more organized and re-use pieces of code. Here is an example of a function that takes input a and b (numbers) and returns them by adding them up :
				# Defining a function
add_numbers <- function(a, b) {
  return(a + b)
}

# Calling the function
result <- add_numbers(4, 5)
print(result)  # Output: 9
Lucky for R users, there exists libraries that contain functions that are already created so that you don’t have to invent them yourself. We call these libraries: Packages. To download and then load such a package you can simply do :
				# Install package
install.packages(ggplot2)

# Load necessary package
library(ggplot2)
We are now going to use the ggplot2 package to create a bar plot using the earlier imported data. The bar plot will appear in your output pane under the tab plot. We use the following code :
				# Create a bar plot of bacteria vs colony size
ggplot(data, aes(x = Bacteria, y = Colony_Size_mm)) +
  geom_bar(stat = "identity", fill = "green") +
  labs(title = "Colony Sizes of Different Bacteria", x = "Bacteria Species", y = "Colony Size (mm)")
Just as with every package in R you can find online a bunch of information about how to use it and what kind of options exist. We encourage you to play around with the data and the ggplot package to obtain a better understanding on how to work with packages within R.
2.4. Useful links and videos
2.5. Practice exercises
Exercise 1 (easy)
Assign the number 42 to a variable called num. Multiply num by 2 and print the result.
Exercise 2 (Intermediate)
Write an R script that prints numbers from 1 to 10. Modify the script to print “Even” for even numbers and “Odd” for odd numbers.
Exercise 3 (Hard)
Write a function that takes two numbers and returns their sum. Create a data frame with student names and their scores, then display it.